Not All Chocolate Chip Cookies are Created Equal
- CarolOfMoon

- Dec 7, 2021
- 6 min read
Updated: Dec 11, 2022


perhaps you'll read the first paragraph with the profound voices of our founding fathers, or maybe the rapid-fire stiletto rap of Angelica Schuyler...
We hold these truths to be self-evident, that not all chocolate chip cookies are created equal, that they are endowed by their creator with certain unalienable ingredients, that among those are butter, brown sugar and semi-sweet morsels. But what we fail to realize is that the creator can make the cookie's pursuit of happiness a success by creating them the proper way. For what else does a chocolate chip cookie aspire to be if not baked properly and loved by all? Oh, and eaten, of course!!
Sure, we all know something about making chocolate chip cookies from 'scratch', but do we really?
Since baking is an exact science, one wrong ingredient or one wrong process can destroy a perfectly good recipe. And there usually isn't much to do to fix a broken baking recipe except to start again. With the increased prices of ingredients like butter, semi-sweet morsels, and sugar, any wrong move can cost good money.
I have never been a great baker; I don't claim to be a cookie queen or cake boss. I've read recipes for the easiest chocolate chip cookies and yet, they turned out flat. Or hard. Or both. Until now.
The recipe itself is no secret family recipe. The best I've found is located on the back of the Toll House Semi-Sweet Chocolate Morse package sans nuts. The technique on the recipe needs further explanation.
I'm guessing that in 1938 when Ruth Graves Wakefield chopped up a Nestles semi-sweet chocolate bar and added it to her cookie recipe it wasn't a big secret what that decadent new ingredient was. Sure, some people add milk chocolate morsels, some nuts, some an extra egg yolk to make the cookies fluffier. What they fail to tell you is the process in making the best damn chocolate chip cookie. But I'm here to demystify the chemistry behind an airy, soft yet chewy chocolate chip cookie.
Learning these ABSOLUTELY 100% most important processes is key to a successful batch of cookies, every time.
Christina Tosi, a 2012 and 2015 recipient of the James Beard Rising Star Chef of the Year Award (2012) and Outstanding Pastry Chef (2015) demonstrates and talks about the process in an episode of The Chef Show ( Netflix, S2E1). She is the chef, founder, owner, and CEO of Milk Bar, the sister bakery to the Momofuku restaurant group. (Check out OPP section of website for something Momofuku)
Cooking Class with Carol
Things to Consider
If anyone has ever baked a cookie, there are very precise procedures in very precise orders to combine ingredients. It's usually:
cream butter and sugar
add eggs and vanilla
add sifted dry ingredients
fold in add-ons-- morsels, nuts, etc.
bake
Fine. Makes sense. But what all of these recipes fail to explain is the chemistry behind the processes. And to me that's the most important part. Get your pencils out, students-- chemistry class is about to happen.
Cream butter and sugars-- 'Gravity Defying' 10-minute creaming process.
you have to force the butter and sugar together harder and faster than you every thought you needed to do. Ten minutes...minimum on high (start on low to incorporate the ingredients together or you'll have a helluva mess on your hands) with the paddle attachment of a stand mixer. The mixture becomes aerated while the butter is dispersed through the sugars. By bashing butter against the sides of a bowl, whether you're going at it with a spatula or with a stand mixer, you're folding it over and over, creating little pockets of air with every turn. Add sugar, and suddenly that process is way more effective, building up an expansive network of sugar crystals, fat, and air. This process is why the dough needs to be refrigerated before baking. We fluffed it up and heated the butter with the energy of mixing it so violently. The butter needs to cool down again and rest; we just beat the shit out of it.
According to Tosi, "if you short-change that creaming process by a few minutes, your cookies will still come out pretty darn delicious, but you might have the butter bleed out of the cookie a little bit or the cookies might be misshapen."
Add eggs and vanilla-- scrape down the sides and continue to cream these ingredients into the gravity defying butter and sugars. You can't really over mix THIS part. If you still have to sift your dry ingredients together now is the best time to do so.
Incorporate your add ins--- just morsels in my favorite cookie. You don't want to beat these too much or the morsels will break apart. Mix on low until fully incorporated.
Add dry ingredients. This is the part where we really can mess things up. THIS IS THE QUICKEST part of the process. Don't overwork your dough, please! Make certain you are very careful to only mix it just as much as you need to, to where you don't see any dry ingredients. It now looks like cookie dough. Otherwise, you're going to start turning your cookie dough into bread dough. If we over mix the flour it will start to produce gluten-- and will make a dense hard dough-- and that's not what makes an airy, soft and fluffy chocolate chip cookie. Overworking = tough, misshapen, and crumbly cookies. Overmixing your dough usually makes cookies tough and shrink into weird shapes, but it can also make them crumbly. Generally, you only want to mix just until the flour disappears, and then stop mixing!
Chill in refrigerator-- The dough needs a rest after the romp it had in the mixer-- for at least 30 minutes up to 24 hours. This is where the butter will congeal back to a solid and the dough will stiffen up. If well-wrapped this dough can last for three to five days in frig before cooking. I tend to bake the cookies the same day I make the dough. I portion the cookies with an ice cream scoop to keep the cookies uniformly sized and then refrigerate on a cookie sheet.
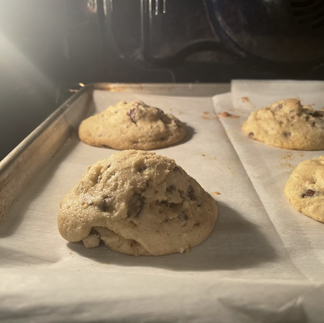
Bake-- once I am ready to bake the cookies, I transfer to a parchment lined sheet pan 3 to 4 inches apart. with the size of cookies I make, only 5 cookies fit on each sheet pan.
baking times are approximating, since everyone's ovens are different. Baking at 375 degrees ensures proper baking process, but do we really know if the oven is actually at that temperature? Adding a removable oven thermometer to the inside of the ovens show the exact temperature inside the oven.
Whatever the cooking time on the recipe calls for, I split that in half. Halfway through the cooking time I rotate the sheets 180 degrees--so front is now in the back and back is in the front to ensure even baking. Although I bake in a convection oven (meaning a fan blows air around the inside of the oven) the back of the oven is always hotter than the front. Rotating ensures a more even cooking process.

Ingredients
· 2 ¼ C. plus 1 T. all-purpose flour
· 2 C. (12 oz pkg) semi-sweet chocolate morsels
· 1 C. (2 sticks) butter, at room temperature
· ¾ C. granulated sugar
· ¾ C. brown sugar
· 2 large eggs, at room temperature
· 1 t. baking soda
· 1 t. salt
· 1 t. vanilla
· optional, 1C. chopped nuts, if adding, omit 1T. flour
What to do*
* Refer to the Cooking Class with Carol section for in depth detailed information
1. Preheat oven to 375 degrees.
2. Measure and sift all dry ingredients into a large bowl. Set aside.
(it's best to measure level dry ingredients. Use a flat edge to scrap off excess ingredients)


3. In a stand mixer fitted with the paddle attachment, add softened butter and both sugars. Cream for no less than 10 minutes, on high. *This is a very important step that needs to be followed precisely.


after 1 minute
After 10 minutes
scrape down sides to incorporate all of the butter and sugars


4. add eggs and vanilla. Continue to beat on high for 1-2 minutes. incorporate vanilla and eggs thoroughly.
5. Add chocolate and nuts (optional) and mix well, being careful not to overmix and break morsels.


6. Add sifted dry ingredients. On slow speed, in a pulsating action, mix to combine. It’s important to NOT over mix.
7. place parchment paper on baking sheet and using an ice cream scoop of the desired size, scoop cookie dough onto pan.


8. Chill cookie dough scoops in refrigerator for 30 minutes.
9. On parchment lined baking pans, arrange the chilled cookies about 2-3 inches apart. They will spread while cooking.
place in oven and bake 9-11 minutes for smaller cookies, 12-16 minutes for larger cookies.


10. Remove from oven and let cool on pan for 2 minutes.
Transfer to cooling racks until completely cool.
ENJOY!!


CarolofMoon,, excellent, excellent dissertation of a classic cookie recipe !! If anyone screws this up after your magnificent rendition ,they shouldn't be baking a damn thing.. Appreciate you!! "Fourscore and seven years ago our fathers brought forth, on this continent, a new nation, conceived in liberty, and dedicated to the proposition that all cookies are not created equal" your first paragraph was much better...